Wednesday, February 1, 2012

Swap - Lyssa's Convention Quality Swap


I joined 3 groups for Lyssa's Convention Quality Swap for Leadership this year. This swap was posted at SCS (http://www.splitcoaststampers.com/) on the demo side of the site. I happen to follow Lyssa alot on her blog (http://www.songofmyheartstampers.com/) . I chose to use 3 stamp sets that are in the Idea Book and Catalog instead of the Occasions mini. Many people had signed up with stamp sets from the mini - but we are still selling sets out of the Idea Book.


The first card photo was made with Greenhouse Garden and En Francis background. I stamped the EnFrancis in Soft Suede onto Very Vanilla Cardstock. Then I sponged it with Crumb Cake ink. Over that I stamped the flowers with Calypso Coral and the interior of the flowers with Poppy Parade. Notice I did stamp off some of the flowers. The ribbon is Calypso Coral. The cardbase is Soft Suede with a Poppy Parade mat. Sentiment comes from Blessings from Heaven. I used my Early Expresso and Poppy Parade markers to ink the sentiment on Very Vanilla cardstock. Then I used an Oval punch to punch it out. The mat is Poppy Parade cut from the Scalloped Oval punch.


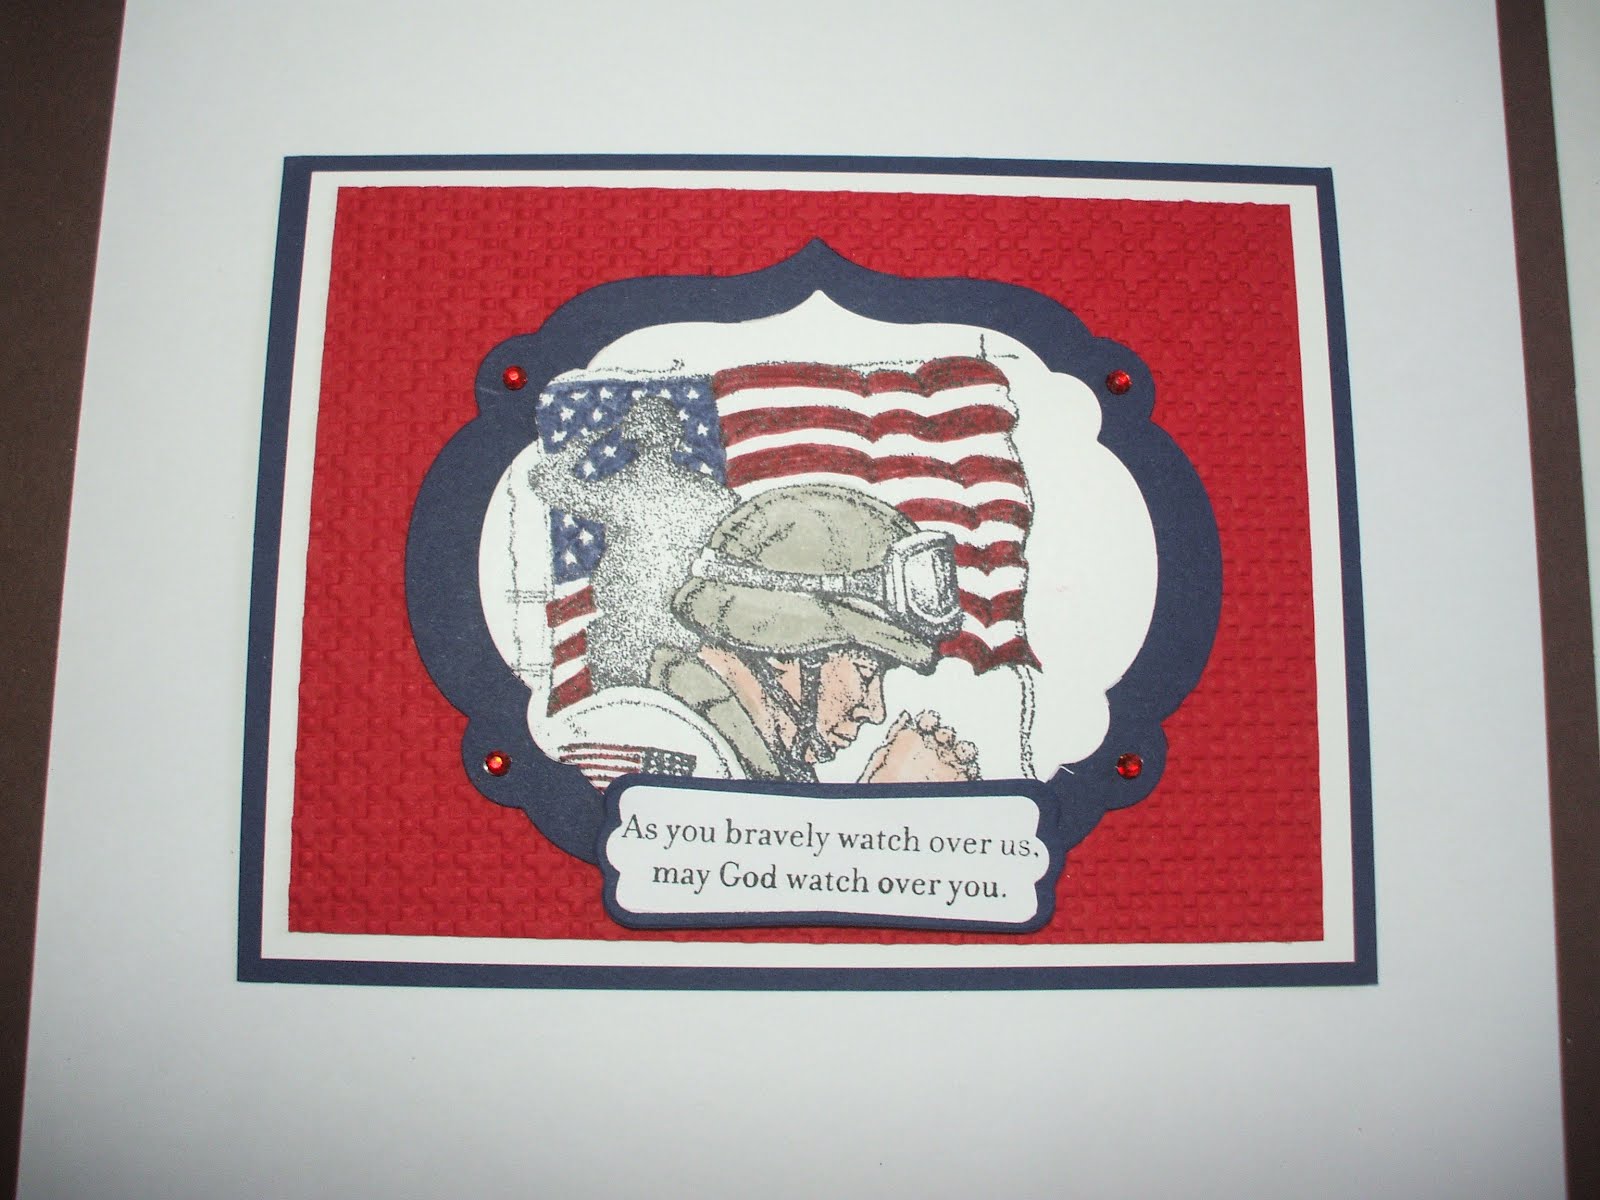
Card 2 is one stamp set that I don't think gets enough ink. That stamp set is Courage. I stamped the image with Black stazon onto Whisper White cardstock. Then I cut it out with our new Label Framelits. I also cut a Night of Navy mat with the Label framelits. The red mat was ran thru the Big Shot with the Square Lattice Embossing folder to give the card some texture and depth. Then I used a white mat to make it more eye-appealing (and not overly a dark card) and put it all on a Night of Navy base. Coloring was done by markers. Sahara Sand for the uniform, Real Red for the stripes and Night of Navy for the background of the stars. Believe it or not, this is the only card of the bunch I forgot to color the shoulder of the soldier. When I saw the photo I went back and remedied this problem. Because we had to add an embellishment, I colored 4 rhinestones with a red Sharpie permanent marker and added them to the card. I love that Sharpie marker trick on the clear rhinestones (and my pearls) to achieve the color I want for my card. The sentiment was stamped with Night of Navy on Whisper White cardstock. Then cut with the Word Window punch. It was matted with Night of Navy cardstock and cut out with a Modern Label punch.


Card 3 uses the stamp set Everybunny. The background paper comes from the Hostess section of the catalog. It's on page 11 and it is called Cheerful Treat DSP. I stamped that cute bunny in the balloon using Stazon black ink onto Whisper White cardstock. Then colored it in using Pink Pirouette, Concord Crush, Lucky Limeade and Bashful Blue markers. The mat and the card base are Wisteria Wonder. Then I got creative and used the Word Window punch to cut out 3 white strips. Matted them onto 3 Wisteria Wonder punches made with the Modern Label punch. Attached them to my image base and then started adding embellishments. As you see, I chose 3 flower buttons and placed rhinestones in the center of each button. The sentiment was stamped in Concord Crush and cut out with an Oval Punch. It was then matted in Wisteria Wonder using a Scallop Oval Punch.


I made 20 of each card for my 3 groups. So I came home with 19 new cards (or new to me in trade!). My 20th card in each group I used for open trading when it was returned to me.


I will be back to show you some of the cards I got in this swap.


Monday, January 30, 2012

Card Candy swap from Leadership - Part 2


Card Candy Part 2


1st photo - features a Masculine theme or a Western theme. These lovelies were created by Robin Greer. She used several different Stampin Up stamp sets including: In Wilderness, Out West and an SAB set. Notice her eagle has an antique brad in the lower right corner; love the two toned cowboy too! I can see making all kinds of male cards with these lovelies.


2nd photo - features the new set from the Occasions mini, Bordering on Romance. and the sentiment is from Blessings from Heaven. The creator of these pieces of card candy was Adrianna Benitez. Notice her flowers on the right top tag. She actually stamped the flowers on a blue printed paper, and then hand cut it out to paper piece over her stamped image. She used a marker to give dimension. The sentiment is a beautiful sentiment found in Blessings from Heaven -- and it is so true! Notice she used the new edgelits to create the nice trim on the left side of this photo.


3rd photo- features an assortment of card candy items for various times. This was created by Susan Finn of Tulsa, Oklahoma. I just love the bright summery colors she used. Her mother tag has pearls on it. The thank you tag has a Fire or Ice Brad. The cute yellow rosette bears a banner that reads congratulations. Each of her items has a depth to it, either by using embellishments, dimensionals or layers.


4th photo - features Valentine's. These sparkly items were created by Linda Haupt of Rapid City, SD. She embossed the doily with white embossing powder on red paper and then aded a red glimmer heart (plus a few extra hearts too!). I really like her rosette made with the Twitterpated paper - and check out that tiny jewelry tag punch! One of my favorite Valentine stamps this year came from the new Occasions mini, P.S. I Love You and my favorite stamp in the set is the silhoutte of the boy and girl on the bike.

5th and final photo features a Baby Theme. I made this set. It would work better for a scrapbook than a card. This card card stamp set is also in the Occasions mini, Baby Prints.
I just could not decide to whether to do a baby girl or a baby boy... finally I gave up and drug out my Blushing Bride and Bashful Blue and went to town. While I doing the letters, BABY, I decided to add some glitz to it all by adding the Silver Glimmer paper. I took an extra of this with me and hung it up for the Leadership contest. Much to my surprise, I actually won a prize with it! Woohoo! And many thanks to basketballmom (Gail) from SCS (Splitcoaststampers) who hunted me down to let me know I won a prize. I came home with a roll of Blushing Bride pleated ribbon and the Twitterpated Paper. I gave the buttons to Gail for her notifying me!


While I had never participated or heard of this type of swap before, I am in love with it. I see so many possibilities for card candy. In fact, I showed these to our scrapbook site, The Crop Room (a private group on Ning). We are going to have a card candy swap beginning in mid March. :>


That's all for tonight!

Arlene


Card Candy swap from Leadership - Part 1


Card Candy - I was reading a post about a Card Candy swap, and I was clueless. So I wrote the hostess of the swap, Bobbie Ganley, and asked about it. Basically card candy is either for cardmaking or scrapbooking. Most people give these as a gift to the hostess who holds a party. I think of them as "homemade, creative Jolee's" done" with stamps, tools and embellishments I already own. Just think of the possibilities to customize them in the colors you need. Perhaps you are sending blank cards/envies to someone with a package of card candy. That way the recepient can make their own cards or use the designs on a scrapbook page.


The first photo is of Card Candy featuring the Fancy Flower Punch. This was created by Candy Rattray of San Antonio, Texas. I really love how Sandy used her Fancy Flower punch. Her accessories include a Hershey kiss, buttons, rhinestones and Fire or Ice circle brads, and punches on dimensionals. Just a note for you -> Did you know you can color rhinestones with a permanent marker (Sharpie or Bics for example) to create the color rhinestone you want to use? Easy, peasy! I purchased a huge set of permanent markers and now I can color rhinestones in any color I need for a card or a scrapbook page. I simply buy the SU clear rhinestones and I am set to go!


Card Candy # 2 features Birthday Card Candy. This was created by Bobbie Ganley (our Swap Hostess) . I think she did an awesome job one these creations. Love the little cupcake with the cherry on top! She has a layer at least on each of her items. Nothing is flat and static - instead each have depth and dimension (as well as some nice colors for birthday items). Among the Stampin Up stamp sets used are: Bring on the Cake, Create a Cupcake, and A Word for You.


Card Candy # 3 features the new stamp set in the Occasions Mini, Tea Shoppe. It was created by Carol Siers of Wilmington, Delaware. I admire Carol because she hand cut that large teacup, including the inside handle. That is something that is difficult for me to do these days with my fine motor issues from all the chemo. She displayed many of the stamps from this set in her card card treatment.


Card Candy # 4 features flowers - made from stamps, punches, and our Paper Daisies. It was created by Gail Beezley of San Antonio, Texas. I just love the top left flower from the Stampin Up stamp set, Flower Fest . Doesn't that flower have a springy feel to it? Another favorite in this set, is the flowers with the IN COLOR Glimmer brads and tiny pearls (looks like they were colored with a sharpie too!) on the flower in the bottom left corner. Those flowers come the Stampin Up stamp set, Vintage Vogue.


Card Candy # 5 features a kid theme. This was created by Stacey Tomkowiak of Aurora, Illinois. Among the Stampin Up stamp sets represented are: I Dig You, Little Princess, and Easy Events. I just love the little brads on the construction equipment on the top left side. Makes it have a more realistic look. The water really sparkers on the baby duck at the bottom. And of course, our little princess has a rhinestone in her tiara.

That concludes part 1 of the Card Candy swap. Stayed tuned for the other 5 swap items in the next post.


All these ladies mentioned are Stampin Up Demonstrators. If you live in their area, I am sure they would appreciate you contacting them about their clubs, classes and events.


Arlene


Roommate gifts at Leadership


The top photo is a silk scarf that my roommate, Deb Mueller, hand stamped with the
Awash with Flowers stamp set. Isn't it beautiful? I wore it last week to school with a pink sweater and gray slacks. Got soooo many lovely comments on it. She delivered her gift inside a SU stamp case that she had decorated and added a pen/notebook inside of it.


The bottom photo is a pin cushion made with Deck the Halls fabric that my roommate, Sandy McFarlane created. Love that Victorian look and the hat shape itself.


Leadership was an awesome experience. I highly recommend if you have the opportunity to go to the Leadership Conference in 2013, that you go! I admit this time I went, not because I had the opportunity, but because of a carrot that was dangled in front of me.... Anyone with a Manager or higher title got to attend the Manager's Reception and then see the Chinese Acrobats of Heibi perform. I ran across another Arkansas demo at Leadership, Elaine Accord of Jacksonville. Elaine and I sat together for this reception and then the performance.


We were served drinks made of ginger ale and grenadine and then waiters/waitresses wandered around with trays of food with a Chinese theme. I saw noodles, wontons, egg rolls, marinaded beef on a stick and marinaded chicken on a stick. I loved the chicken and its flavor!


The Chinese Arcobats were awesome. I held my breath many times during the performance when one gentleman was building a structure and performing off of it... it was stacks of chairs going from the stage floor to the bottom of the stage valance curtain. He certainly had my heart pounding! These young acrobats were certainly talented!


Sunday, January 29, 2012

Welcome to 2012!


SHOCKED ? AMAZED ? Yes, I still have a blog. So lets play catch-up!


Okay, I realize I have been away from my blog for over 1 year. It was so hard to come back and post things. I kept reading about my final trip to see Zio Corrado and it made me sad. Now, I can look back on it, and am comfortable with it. I am so happy I did have the opportunity to see him again.


Healthwise, you know I relapsed last January 2011 and had to have more surgery and then chemo every week until mid-July. I went to every other week chemo in August.I was allowed to return to work in August, although my doctor would have preferred me wait a few more weeks/months. This Friday, I have my 3 month scans and chemo again. I don't expect any bad news. Frankly, I am waiting for the May scans. If those are good, chances are I will move to having chemo once a month instead of weekly. That would give me more stamina, energy and normality.


Personally, I have been working hard on my Stampin Up Business, as well as my personal cardmaking and scrapbooking. I went to the Leadership and Regional Conferences and had a wonderful time scooting around in an electronic chair. The convention center was tooo big for me to walk, especially with low blood counts.


This spring I have 2 stamp clubs, will be doing monthly card classes, and starting a beginner and an intermediate scrapbooking class. Am so excited about doing more classes with my friends and customers. I so love my crafts!


The photo aboveis a "cased" (means I used someone else's design and modified it) card that I will be teaching at my BRING A FRIEND Card Class on February 11th. I offered my friends and customers the opportunity to bring a friend to class and it cost $20 for both of them together, instead of $20 per person. Then I also opened the class to a morning and afternoon session. Out of 24 seats, I already have 18 seats filled and there is still a week to go before the signups close! Woohoo! So I cased a card at the Leadership Make and Take and put my spin on the card. The original was done in greens, and I did mine in blues instead. Take a look at both cards. Not sure why blogger makes all the photos go to the top of the post, but that is okay.


I will be back in a few days to show you some cards I swapped at Leadership and some cards I received in the swaps.


Arlene


Thursday, December 2, 2010

December 2, 2010 -- I know it has been forever!

Just a few random photos of Lucia and Stefano's trip for you to view.

This is Stefano coloring an art sheet in my classroom on November 30, 2010. He was coloring with a student (Patrick). This photo was taken on Petit Jean Mountain in Arkansas on Saturday, November 27th. We were at the Automobile Museum. You see Lucia and Austin on the left and Jenny and Stefano on the right. It was a beautiful day!

This closeup of Lucia and Stefano was taken at the top of LOOK OUT POINT on Petit Jean Mountain, Arkansas on Saturday, November 27th.

Bruno and Cody preparing the pork loin with garlic and rosemary on Thanksgiving Day in my kitchen.


I have few photos of the trip so far. Jenny and Lucia seemed to be the ones taking the photos, but I did want to share a few with you.


Saturday, July 10, 2010

July 10, 2010 Still moving

A WORK IN PROGRESS
As you can see, the new gas stove is finally here. I need to take a new photo of the kitchen/dining room now that the corner hutches, the dining room table and chairs, and the refigerator are in the house. I had Miss Tish put my apple themed items above the kitchen cabinets. That stereo to the right is NOT staying there. It is there for the week so I have something to listen to while I work. All the cabinets are filled now with my household goods.

You can see I have all my pots and pans in this fantastic shelf cabinet. Love that the shelves pull out so you can see them all. Also love the tile floors!
This cabinet was empty when I took the photo last week. Now it is full of all my can and box food goods. The upper cabinet has the canisters and lots of other stuff. That box to the left is residing where the refrigerator is NOW. It is full of things I am taking to my classroom kitchen.


My pride and joy! My scrapbook work area in the sun room. It has also slightly changed. The small cabinet with paper on the left is gone. I added 4 more of those white cubes for paper. The stamp bookcase on the right is now filled with all my current stamp sets. The retired stamp sets are going to be in my office (the smallest bedroom) on four bookcases. Also my computer is moving to the office. This room above will have my big worktable in front of that chair with the paper wall behind me. Then it will have a round table for people to come and sit and play/scrap. Also I am going to put Bruno's cabinet he built for my Mom's old alterations store in this room. It will store the Big Shot, and all my dies as well as the Cricut and all my cartridges.
All the photos were taken last week on Saturday, July 3rd. I had signed the papers for the house at noon on the 30th, so this is only 3 full days later. I will take more photos today. The kitchen furniture is all here and most of my bedroom furniture. The actual headboard and footboard to my sleigh bed has not arrived. So the bed is on a frame for now. Then the couch, loveseat and recliner are in the living room but not in position. Have to wait until after the movers come with "Luica's bedroom" and my office desk. They will need room to move items to that side of the house.
Speaking of movers, they will arrive here at my rental house on Thursday, July 15 at 8:00. I think we will be out of here and fully moved into the new house by 11 a.m. I have to still do the following:
* Pack the remaining scrapbook room. My friend Lisa is coming today and helping me move the storage drawers in the scrapbook closet to the office closet in the new house.
* Pack the breakable items in my bedroom.
* Pack the little remaining items in my kitchen pantry.
* Pack the last items on my kitchen counters (the toaster, can opener, knife block, crock pot, that sort of stuff)
* Clean off and pack the kitchen table.
* Pack the videos in the video cabinet
* Take the shelves off the entertainment center and store the hardware in my ziplock bag so I do not loose any pieces.
* Finish the laundry and move the clean items to the new house
* Get the luggage out of my master bedroom closet (that is all that is left in there)
* Pack down the master bath on Thursday morning after I shower.
* The garage .... oh my goodness.... the garage. I have to pack the shelf with the tupperware, pack what is in the old metal china cabinet of Mom's, and pack the school items I had UNPACKED.... at least most of my garage is still packed (including all Mom's alterations shop materials). That is my Monday and Tuesday job.
* We still have 8 bookcases, an entertainment center, a recliner, an end table, 3 nightstands, a queen size bed, 3 chest of drawers, a cedar chest, a computer table, many many table chairs, a computer, my tv's, washer, dryer, my old refrigerator (Bruno will get it), Mom's old metal china cabinet and her old metal desk (both going in my new garage for extra storage), Bruno's cabinet he built Mom for her shop (now going in my scrapbook room), 3 plastic bookcases, my Christmas boxes (and there are several of them). I have plenty of work for the movers! Remember I moved here with 2 - 26 ft. moving trucks.
I have given alot of things away -- like 6 boxes of books of mine, a set of Mom's Understanding Human Behavior books, a set of Mom's art books, and a set of Mom's History books. Gave those all to 3 teachers I work with who can use them. I gave away my old couch, corner chair, ottoman and piano to Miss Tish. She loves the idea of new "hand me downs". God bless her soul!
Okay I will get some new photos today, but don't expect a post until Sunday morning.
Have a great day. It is 5:49 a.m. here on Saturday morning and I got to go get busy packing in the scrapbook room.
Arlene