A creative journey in cardmaking and scrapbooking by a Stampin Up Demonstrator.
Saturday, February 18, 2012
Lisa Houston is having a workshop
My friend, Lisa Houston, is having a Stampin Up Workshop on Saturday, February 25th. She asked for 2 cards and a cello bag topper as her Make and Takes.
The first photo shows our cello bag topper. I went to Target and found some Easter candy this morning for the bag. I used a bunch of punches to create the bunny. I told Lisa that the small oval punch was retired, but she wants this bunny. I inked the edges of all the white with Pretty in Pink. Decided to use wiggle eyes instead of drawing eyes - my fine motor skills aren't that great after a chemo session. Of course I used a Top Note Diecut folded in half and stapled it to the cello bag. You don't see the staples because the bunny is on one side and the sentiment is on the other. The sentiment comes from the stamp set Everybunny on page 48 of the catalog.
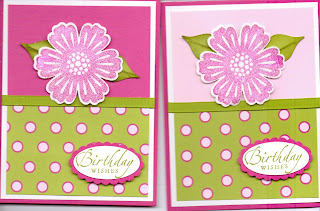
The second photo has 2 cards - we decided to go ahead with the Melon Mambo background instead of the Pink Pirouette background. The dotted paper comes from the Hostess set Cheerful Treat on page 11 of the catalog. I used Old Olive grosgrain ribbon. The sentiment came from Sincere Saluations, which is one of my go to sets. I used the 2 oval punches for the sentiment.
The neatest thing about this card is something I read on Splitcoaststampers. I stamped the Melon Mambo flower on a 3" x 3" piece of Whisper White. The flower is from the stamp set, Mixed Bunch in the Occasions Mini. Then I cut out a 3" x 3 " piece of Big Shot Multipurpose Adhesive Sheets (look on page 216 of the catalog). I peeled off the side with the words Sizzix and covered my flower adhesive side down. Then I punched out the flower using the new punch Blossom (page 17 of the Occasions Mini). After I punch both layers out (the Whisper White cardstock with the flower image in Melon Mambo and covered with the Adhesive Sheet, I peeled off the top of the Adhesive Sheet. I turned the adhesive side down into my tub of Dazzling Diamonds and then shook off the excess. Added some dimensionals to the rear and placed it on my card. The Dazzling Diamonds stayed on the flower this way. How cool was that!
Oh, when I mention my tub of Dazzling Diamonds, let me describe it to you. I take all my embossing powders and my Dazzling Diamonds and my Heat and Stick and place each in a sandwich size plastic tub (like from Gladware). I label all 4 sides of the tub with the name of the contents (that way I can always read what is in the tub). I keep a plastic spoon in the tub too. When I want to emboss or add the powders, now I simply open a tub and shake the excess back into the tub. I never could do a good job with shaking back into those little bottles. I find I am wasting much less of my product this way.
Okay the final card is the St. Paddy's card.I stamped the Shamrock from my stamp set Got Treats in Garden Green on Whisper White. < I did cut off all the sentiments in this set. I do have them all in the box, but don't always use the sentiments -- I was more interested in the images.> Then I ran the card thru the Big Shot with the Square Lattice Folder. This gave me my quilted look. I cut a mat out of Silver Glimmer to mat my quilted look. Added some Garden Green grosgrain. Stamped the sentiment from the stamp Happy St. Patrick's (found on page 43 of the Occasions mini) in Garden Green. Punched it out with the Decorative Label Punch. I also cut out a piece of Silver Glimmer with the same punch and cut it in half to add to the back of my sentiment. Used a few dimensionas and viola!
In every card I make, I always add an insert. In these 2 cards, I choose Whisper White cardstock, cut 4" x 5 1/4" inches as my inserts -- gives you a smooth place to write on a neutral color. Hate trying to find a pen that writes over some of my colored cardstocks.
I have Lisa's workshop all prepped and ready to go for next Saturday. Whew! Off to prep for another workshop for the following Saturday.
Have a great weekend!
Arlene
Subscribe to:
Post Comments (Atom)


love them!
ReplyDeleteYour projects are wonderful!! I hope she had a great party. :)
ReplyDelete